

Swift-DocCを触ってみた話
iOSDecember 05, 2022
タクシーアプリ「GO」のiOSアプリを開発しているTanです。本記事では、WWDC21で発表されたSwift-DocCを触ってみたことについて紹介します。
はじめに
ソフトウェアにとってドキュメントは大事な存在です。
OSSの世界だけでなく、private repositoryでも、ドキュメントがあった方が、新しくメンバーが入ってきた時に、既存のコードを理解しやすいですし、万が一コアメンバーがいなくなった場合に、仕様やコードが属人化しにくく、既存メンバーは簡単に仕様を理解して開発することができます。
ちなみに、DocCはDocumentation Compilerの略だそうです。
今回は、Swift-DocCを触ってみました。
Swift-DocCとは
Swift-DocC は、開発者向けドキュメントを簡単に作成および公開できるようにすることを目的とした、Swift フレームワークおよびパッケージ用のドキュメント コンパイラです。簡単に言うと、Swift Complierに通じて、コードにあるコメントなどを元にドキュメント生成することができます。WWDC22の発表によって、Swift フレームワークおよびパッケージだけではなく、App projectsでも使えるようになりました。(本記事では、パッケージだけを記述します)
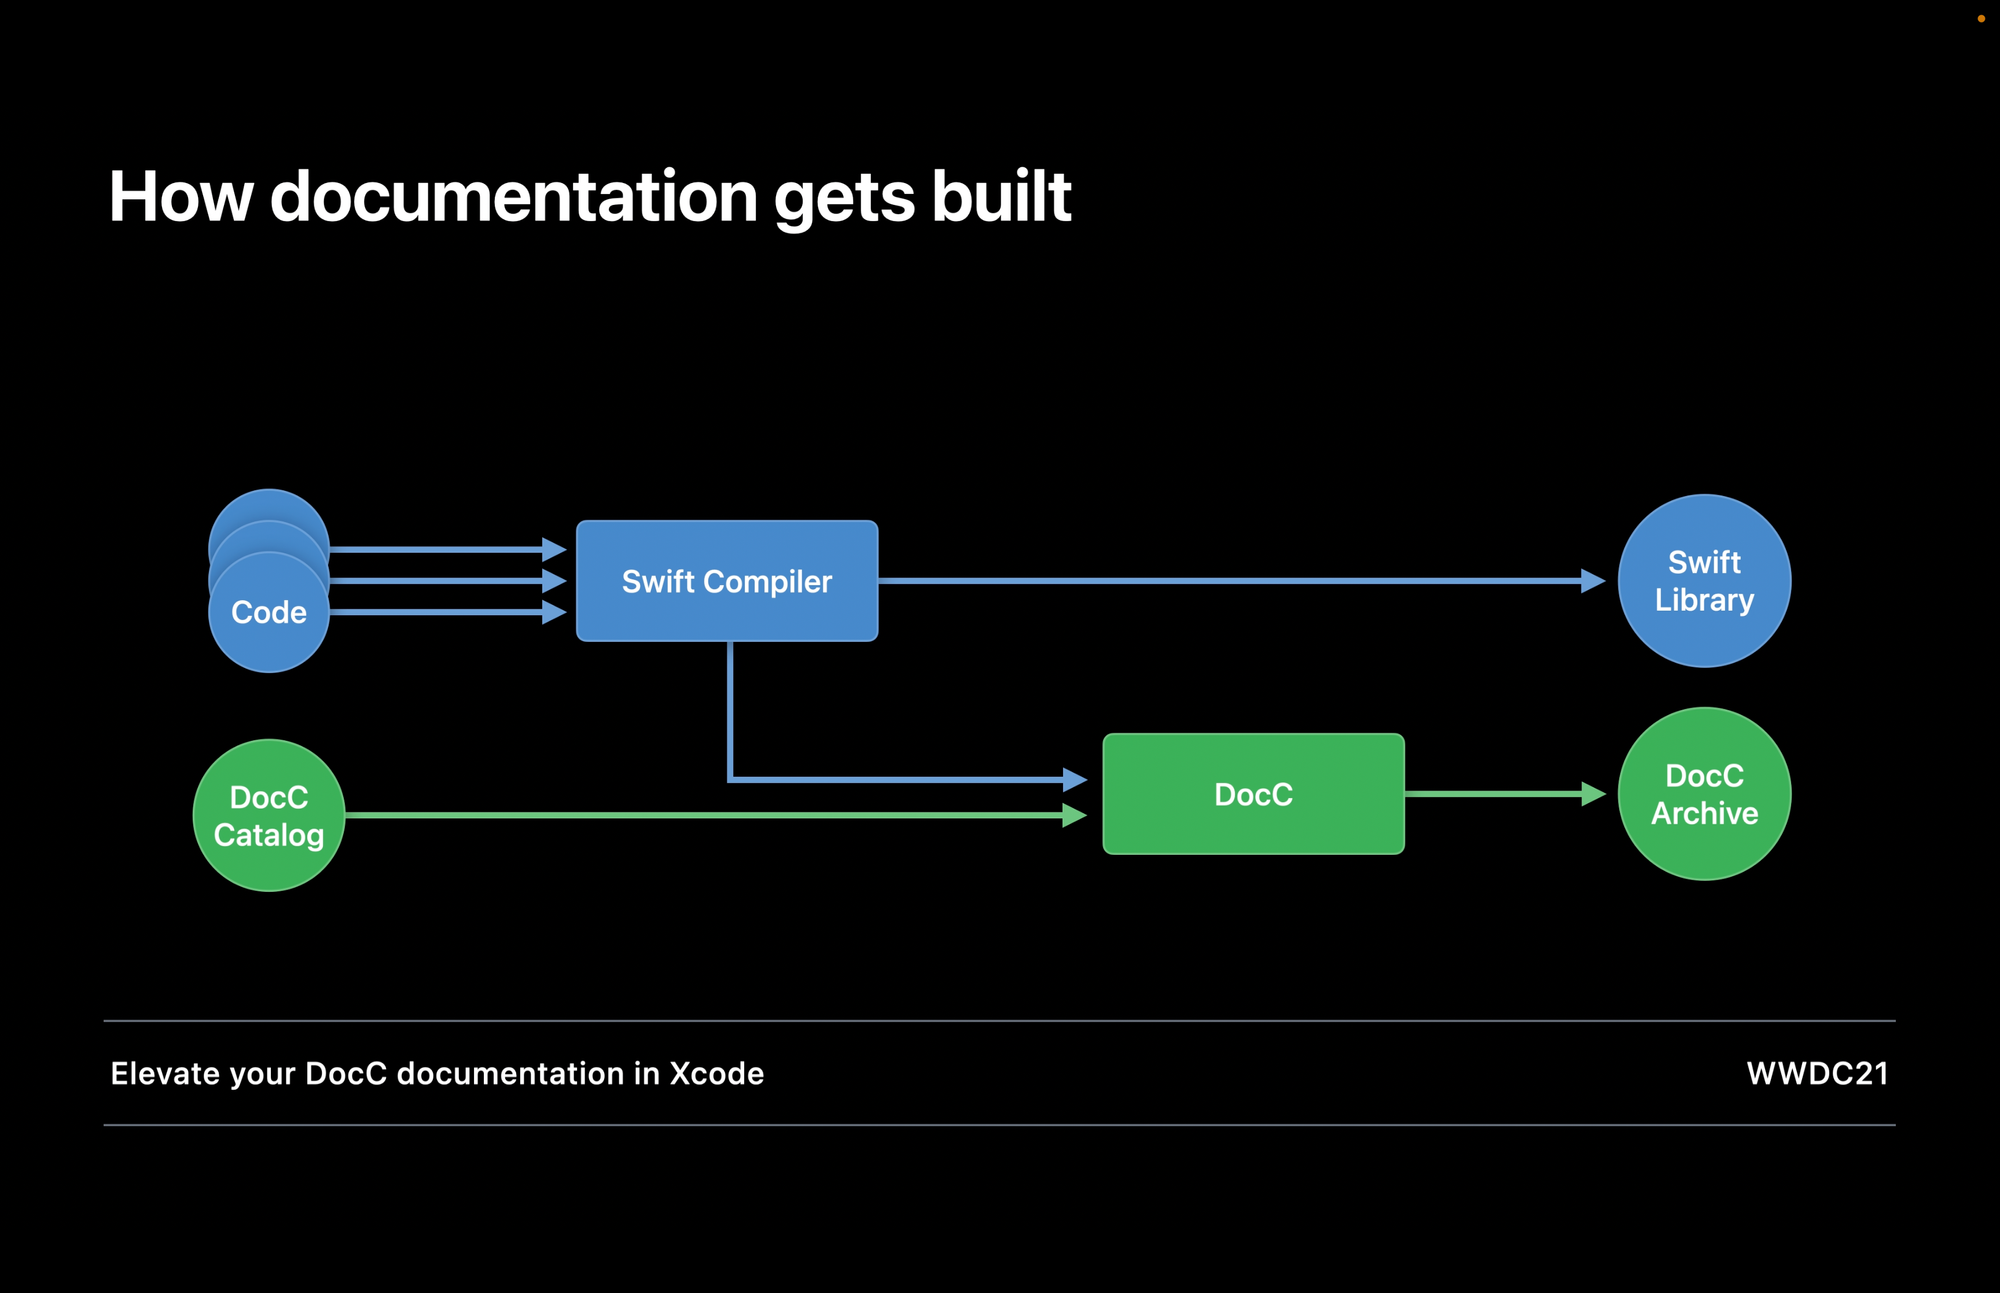
図1
Swift-DocCを触ってみる
前提
- Xcode 13 以上を使用
本記事で使うサンプルは、Apple社が公開しています。
https://developer.apple.com/documentation/xcode/slothcreator_building_docc_documentation_in_xcode
Package.swiftファイルをXcodeで開きます。Xcodeのメニューから「Product」→「Build Documentation」を実行すると、Swift-DocCによってドキュメントが生成されます。
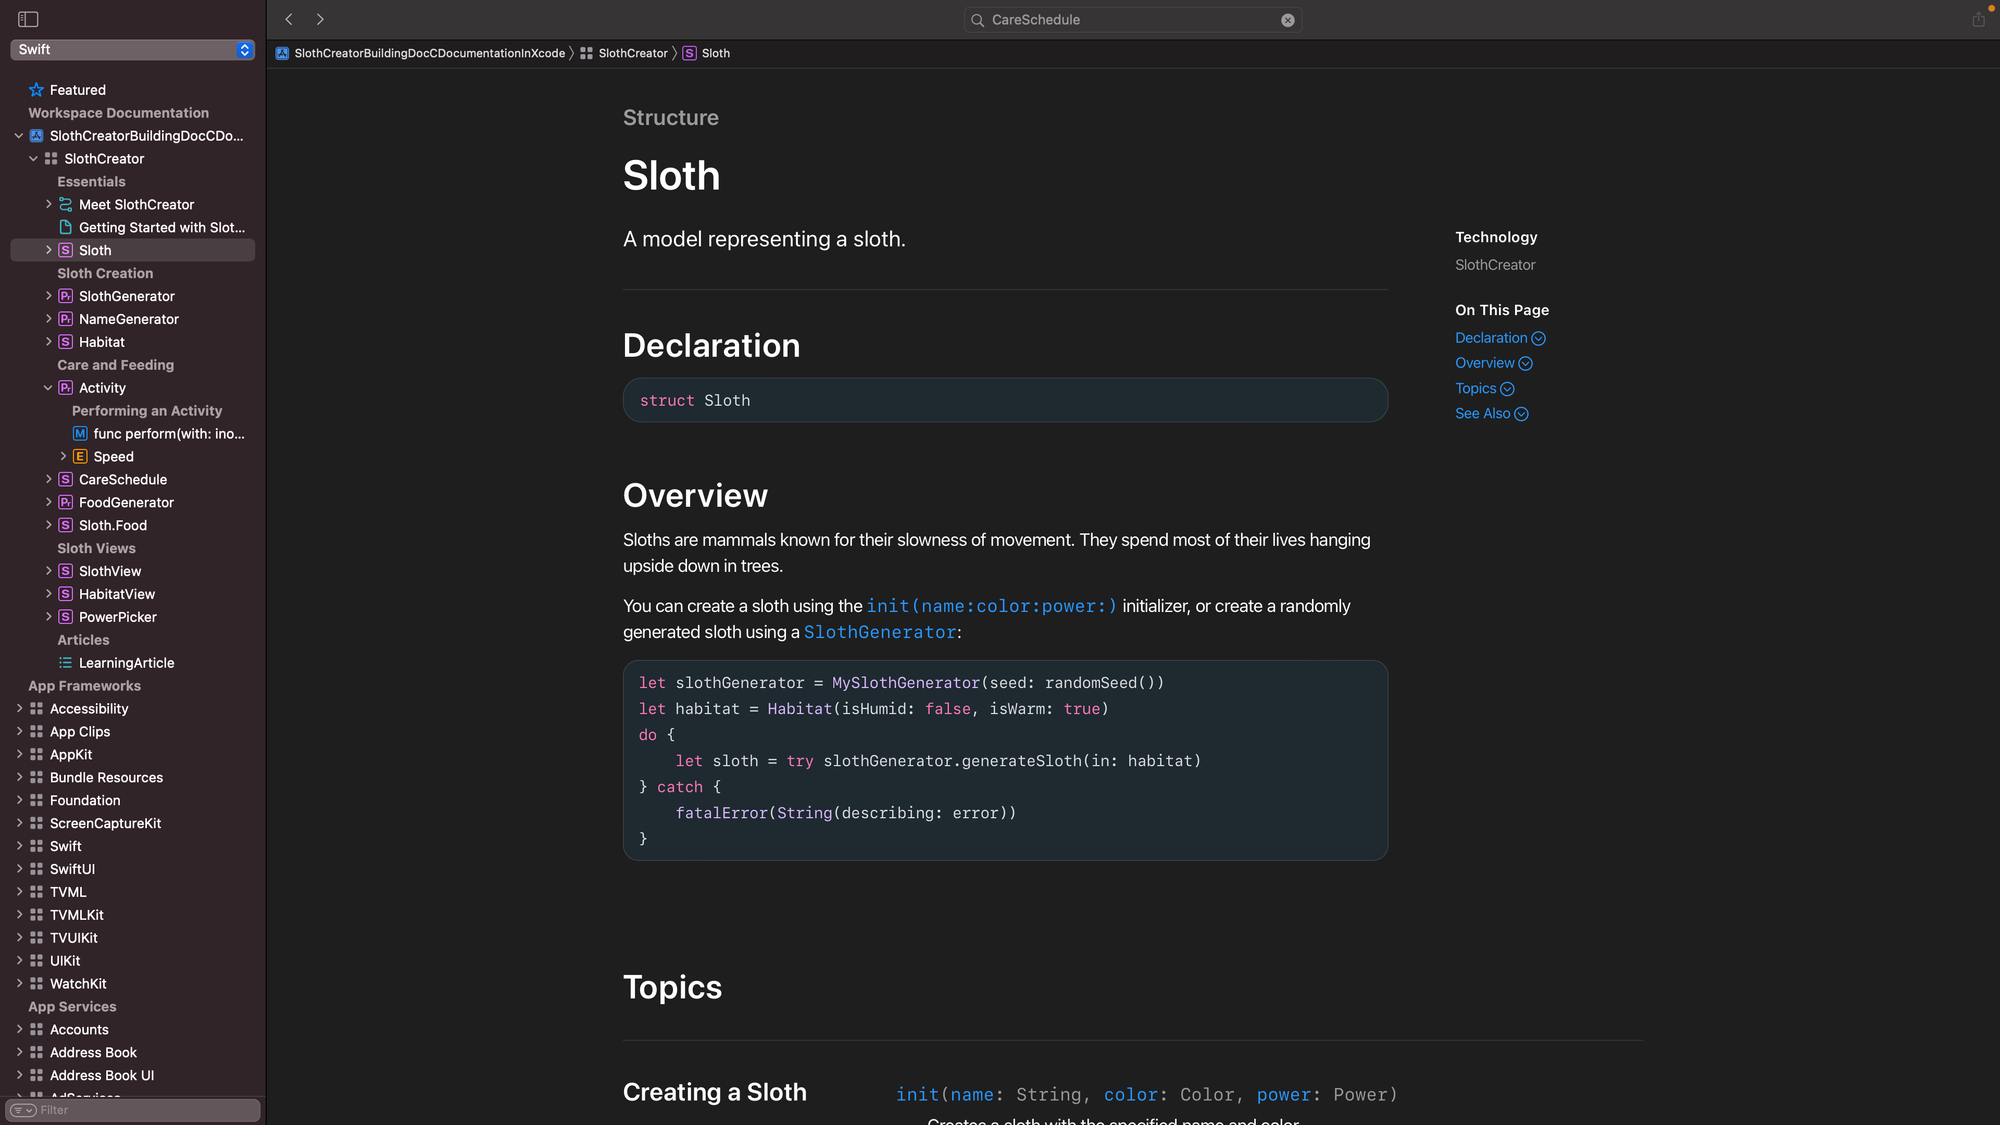
図2
Swift-DocCには、主に以下の三つの形式でドキュメントを生成できます。それぞれを少し触ってみたいと思います。
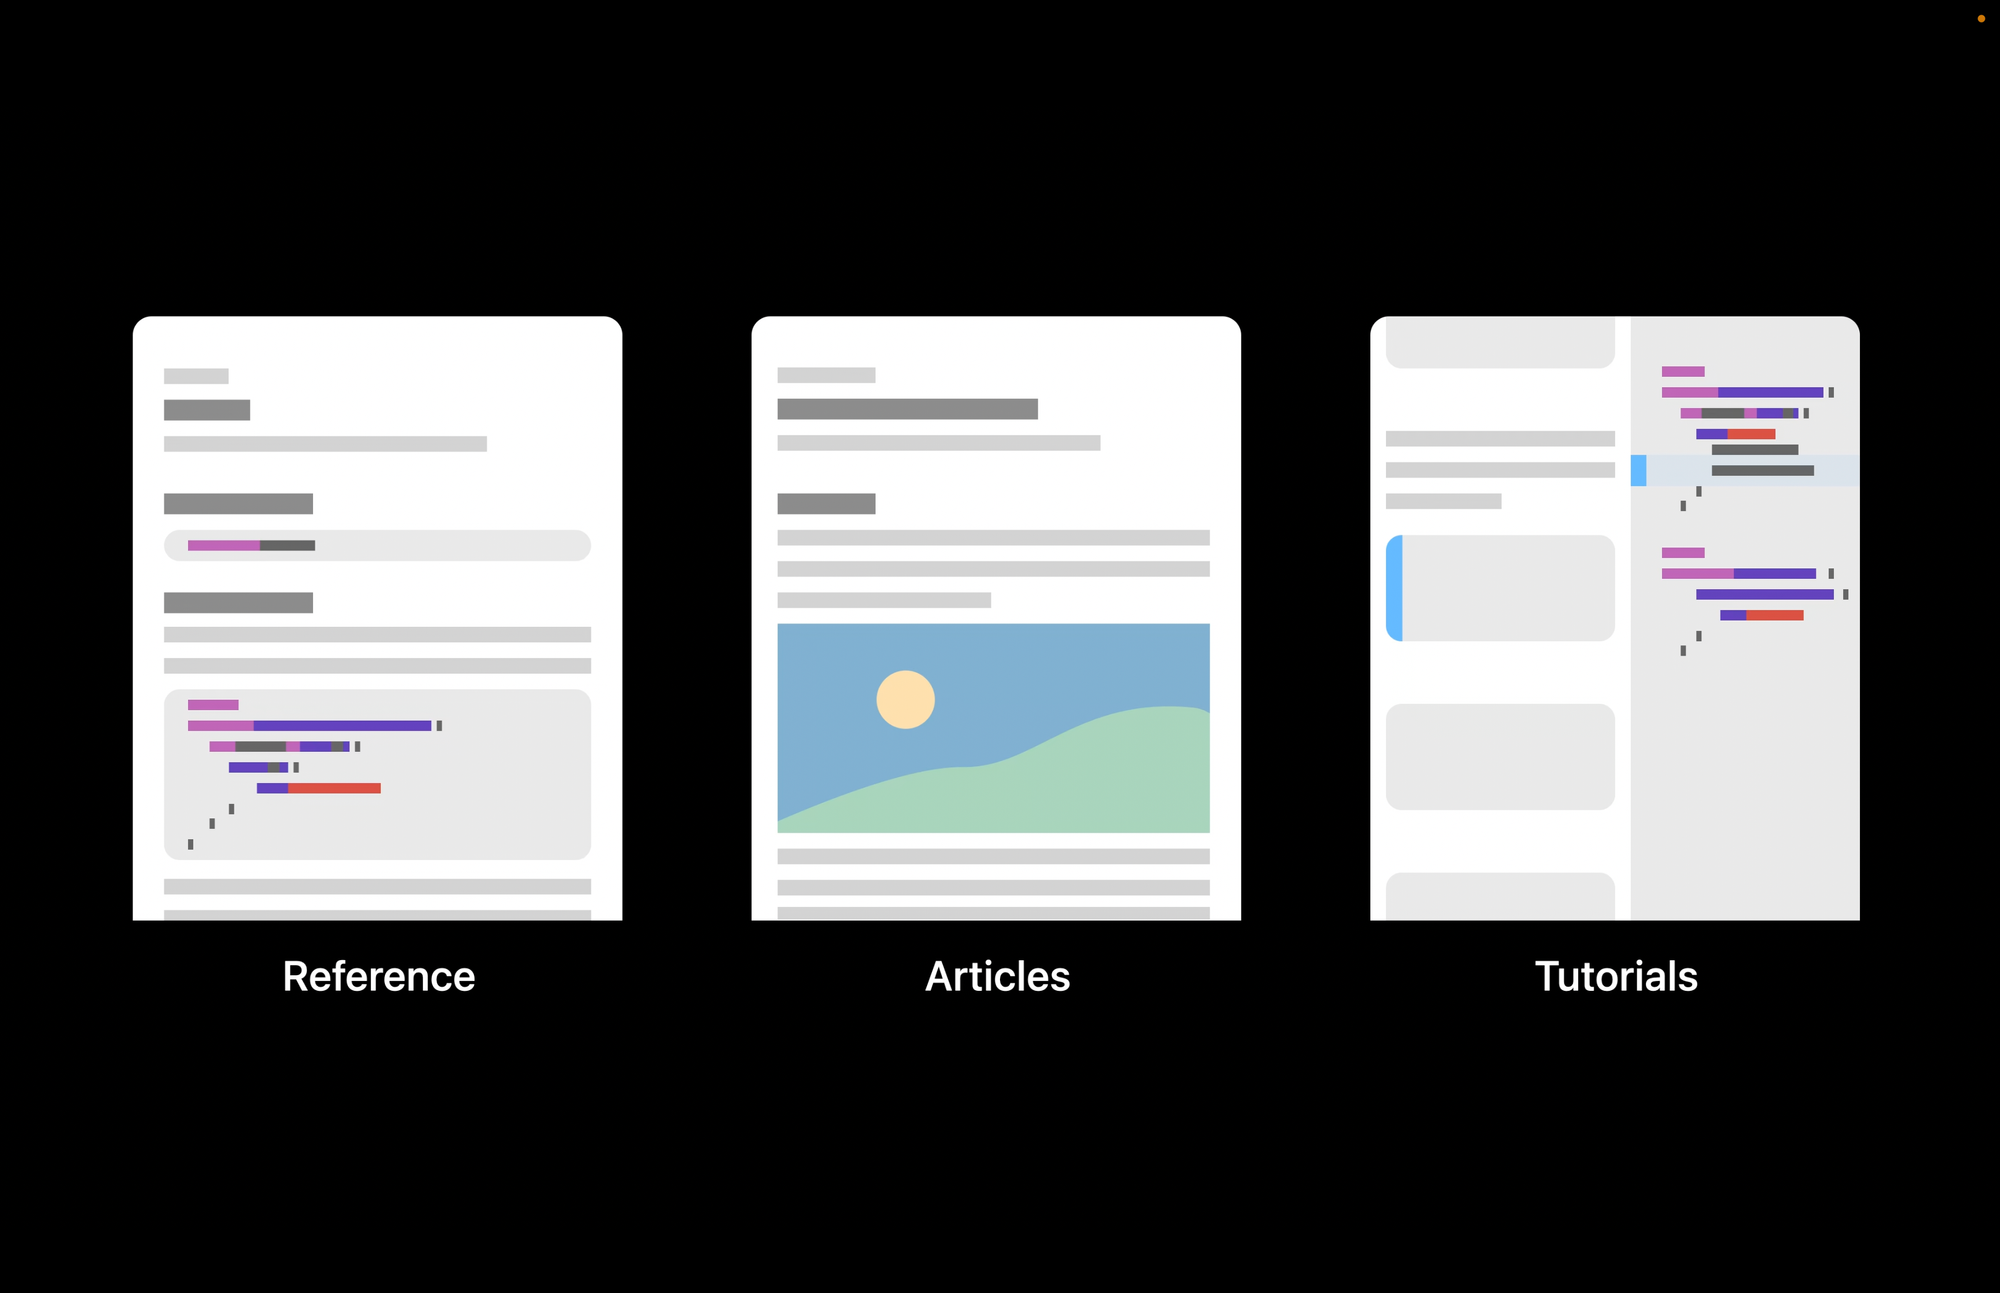
図3
Reference
Sloth.swiftを例とします。これは私たち普段触っているswiftファイルですね。/// や /**から始めると、ドキュメントコメントとしてコンパイルされます。
/// A model representing a sloth.
///
/// Sloths are mammals known for their slowness of movement. They spend most of their
/// lives hanging upside down in trees.
///
/// You can create a sloth using the init(name:color:power:) initializer, or
/// create a randomly generated sloth using a SlothGenerator:
///
/// ```swift
/// let slothGenerator = MySlothGenerator(seed: randomSeed())
/// let habitat = Habitat(isHumid: false, isWarm: true)
/// do {
///     let sloth = try slothGenerator.generateSloth(in: habitat)
/// } catch {
///     fatalError(String(describing: error))
/// }
/// ```先頭の一行A model representing a slothはSlothの簡単な説明文になりますね。一行を開けて、次の文章はOverviewの下に入る詳しい文章になります。また、コードを挿入したい場合は、Markdown形式のコードブロックが使えます。そうすると、図2のようにドキュメントを生成することができます。
また、メソッドに対するドキュメントも作ることができます。次のsleep メソッドを見てみましょう!
/// - Parameters:
///   - habitat: The location for the sloth to sleep.
///   - numberOfHours: The number of hours for the sloth to sleep.
/// - Returns: The sloth's energy level after sleeping.
mutating public func sleep(in habitat: Habitat, for numberOfHours: Int = 12) -> Int {
	  energyLevel += habitat.comfortLevel * numberOfHours
	  return energyLevel
}
みなさんも、メソッドのParametersを見て意味がよくわからないときがあったりしませんか? Xcodeで、cmd + opt + / や cmdを押しながらAdd Documentationを選択し、上記のようにメソッド用のコメントを追加することができます。 生成するドキュメントがどうなるのか知りたいであれば、optを押しながらsleepを押すと、下記の画像のように、previewで確認することができます。
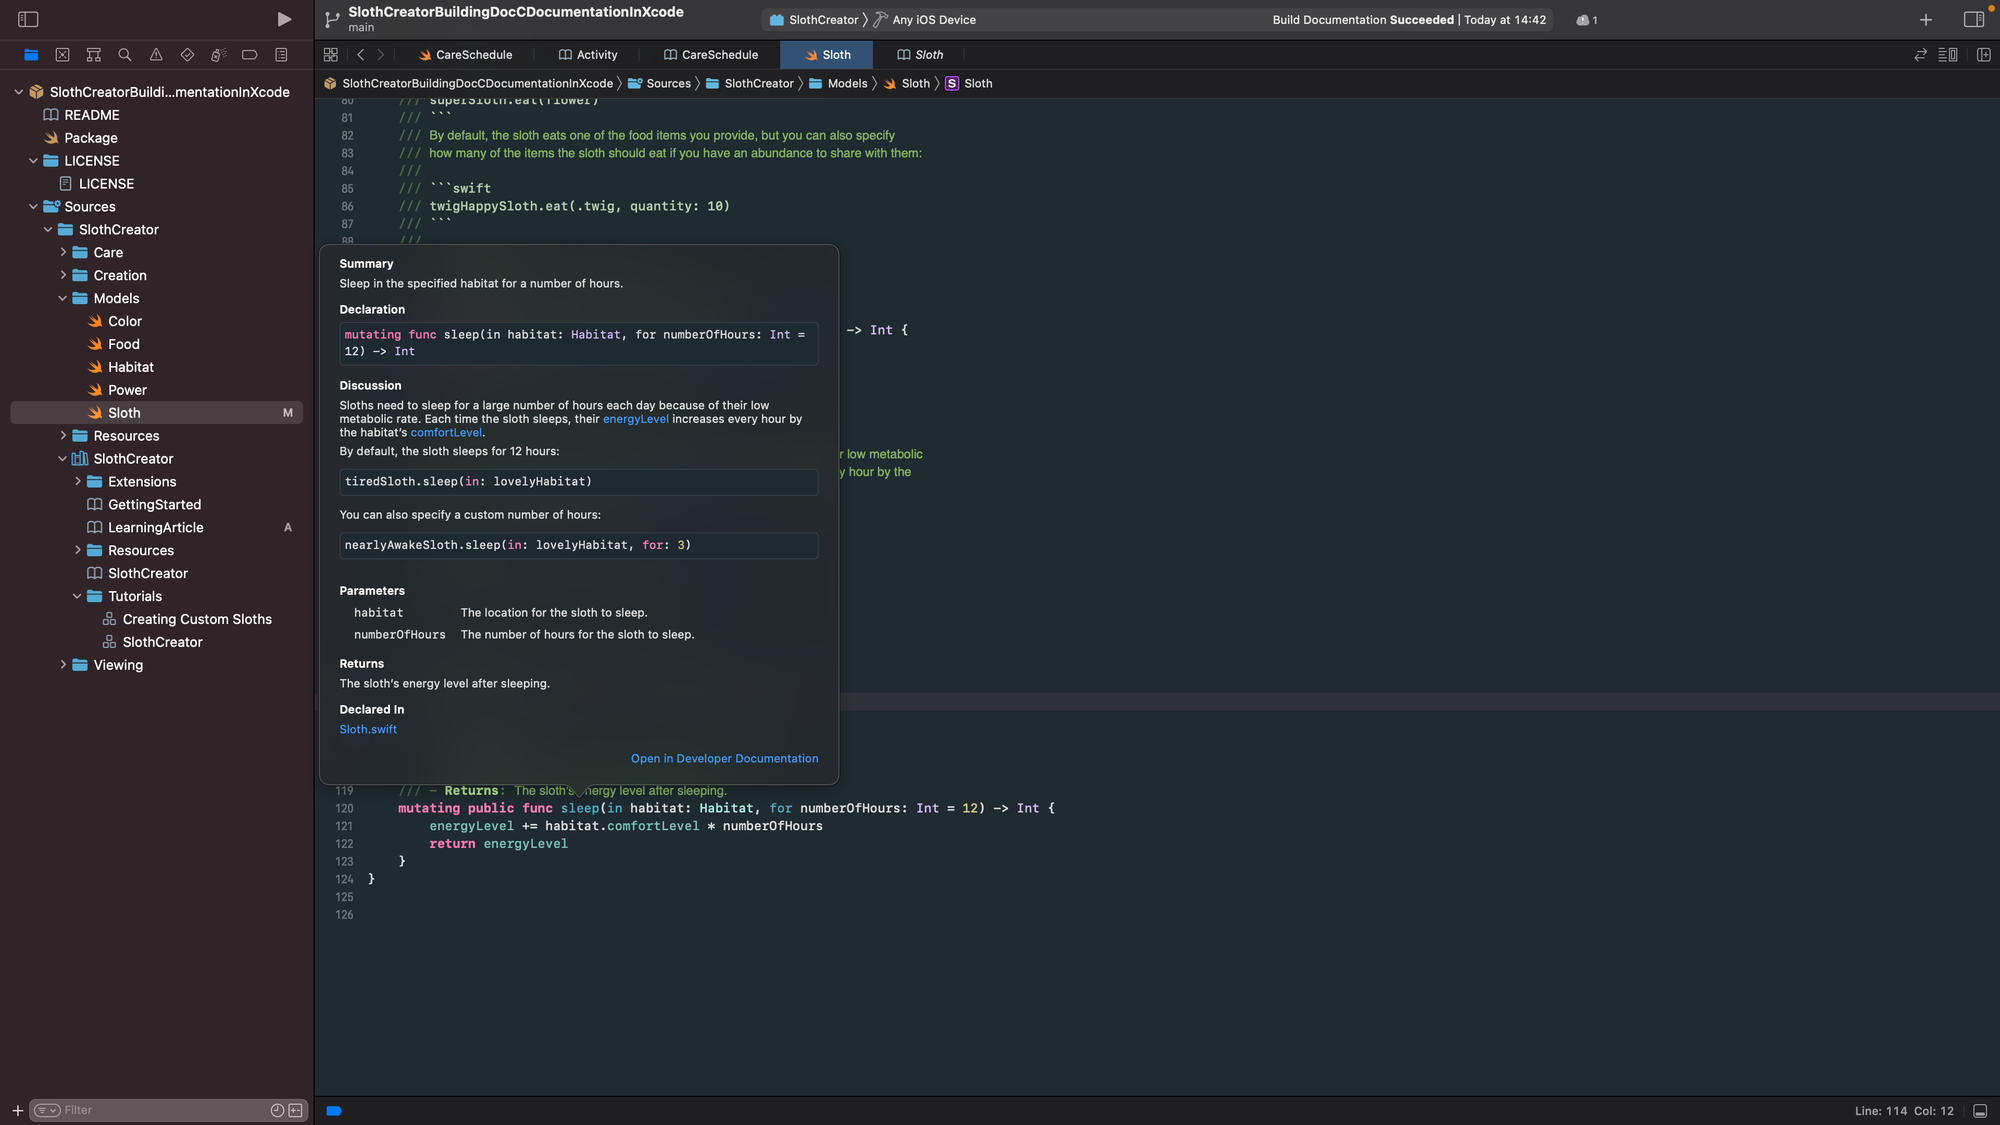
図4
Articles
GettingStartedを例とします。先頭の一部だけ記述します。
# Getting Started with Sloths
Create a sloth and assign personality traits and abilities.
## Overview
Sloths are complex creatures that require careful creation and a suitable habitat. After creating a sloth, you're responsible for feeding them, providing fulfilling activities, and giving them opportunities to exercise and rest.
Every sloth has a ``Sloth/name`` and ``Sloth/color-swift.property``. You can optionally provide a ``Sloth/power-swift.property`` if your sloth has special supernatural abilities.

### Create a Sloth
To create a standard sloth without any special supernatural powers, you initialize a new instance of the ``Sloth`` structure, and supply a name and a color, as the following code shows:
```swift
var sloth = Sloth(name: "Super Sloth", color: .blue, power: .none)
```生成されるドキュメントはMarkdown形式で出力されるので、馴染みがある方が多いでしょう。
ただし、2点ほど注意する点があります。
- 画像を添付したいとき
- 別のドキュメントのリンクを付けたいとき、double backquotes``を使います。``内にファイル名を打つと、自動補完機能も効いてくれるので、かなり楽ですね。
Every sloth has a ``Sloth/name`` and ``Sloth/color-swift.property``出来上がるドキュメントはこれです。
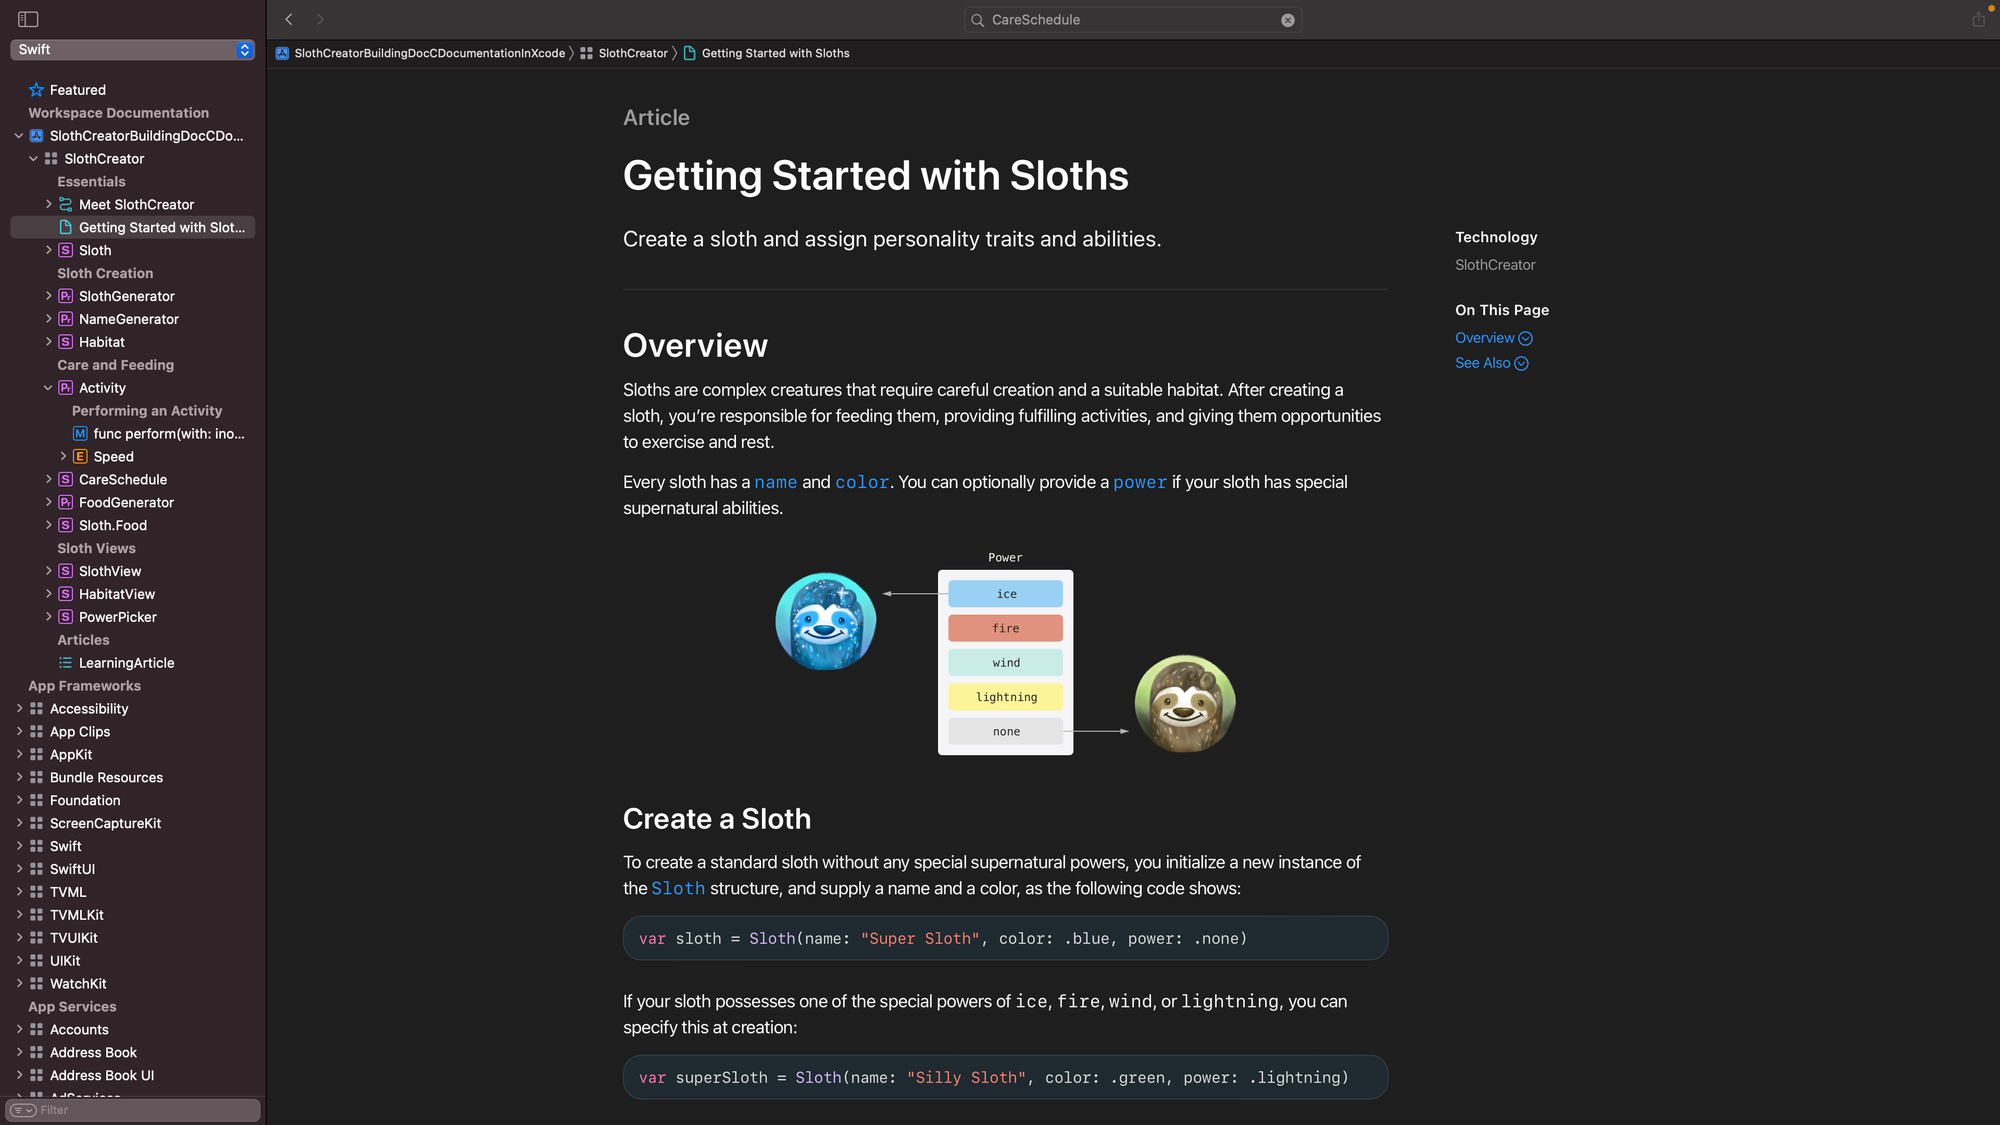
図5
Tutorial
Creating Custom Slothsを例とします。インタラクティブなコンテンツでプロジェクトのドキュメントを拡張します。
@Tutorial(time: 30) {
		@Section(title: "Add a customization view") {
			@Steps {
						@Step {
                Create a new SwiftUI View file named `CustomizedSlothView.swift`.

                @Code(name: "CustomizedSlothView.swift", file: 01-creating-code-02-01.swift) {
                    @Image(source: preview-01-creating-code-02-01.png, alt: "A screenshot from the Xcode preview as it would appear on iPhone, with the text, Hello, World!, centered in the middle of the display.")
                }
            }

            @Step {
                Import the `SlothCreator` package.

                @Code(name: "CustomizedSlothView.swift", file: 01-creating-code-02-02.swift) {
                    @Image(source: preview-01-creating-code-02-01.png, alt: "A screenshot from the Xcode preview as it would appear on iPhone, with the text, Hello, World!, centered in the middle of the display.")
                }
            }

            @Step {
                Create a ``SlothCreator/Sloth`` state variable called `sloth`.

                @Code(name: "CustomizedSlothView.swift", file: 01-creating-code-02-03.swift) {
		                @Image(source: preview-01-creating-code-02-01.png, alt: "A screenshot from the Xcode preview as it would appear on iPhone, with the text, Hello, World!, centered in the middle of the display.")
		            }
            }
				}
		}
}
@Tutorial、@Section、@ContentAndMedia、@Steps、@Imageいくつかdirectiveが使えます。
- @Tutorial:個々のチュートリアル ページにアクセスするためにナビゲートする目次ページの構造を定義します。
- @Section: テキスト、画像、およびタスクのグループを表示します。
- @ContentAndMedia: テキスト、画像、および動画をグループとして表示します。
- @Steps: リーダーが実行する一連のタスクを定義します。
- @Image: 画像を表示します。
Directiveをうまく組み合わせると、SwiftUIの紹介ページのようなページを作成することができます。directiveの使い方は正式なドキュメントをご参考ください!
SwiftUI紹介ページ
https://developer.apple.com/tutorials/SwiftUI
Swift-DocC Tutorial Documentation
https://developer.apple.com/documentation/docc/building-an-interactive-tutorial
おわりに
ドキュメントがあると、コードを簡単に理解することができるようになりますが、最も重要なことは、コードをわかりやすく書くことです。その上で、このようなツールを活用することで、開発効率に努めることが大事だと思います。
今回紹介した機能を使い、下記の場面に活用できるのかをチーム内に検討を進めて行きたいと思います。
- 展開する予定のマルチモジュール
- ドメイン知識複雑な画面
- オンボーディング資料
We're Hiring!
📢
Mobility Technologies ではともに働くエンジニアを募集しています。
興味のある方は 採用ページ も見ていただけると嬉しいです。
Twitter @mot_techtalk のフォローもよろしくお願いします!